Thursday, December 22, 2011

Cookie Memories

For every holiday my husband has one request, frosted cookies. He love them so much sometimes he doesn't let them dry before he digs in! He knows Christmas is a holiday where I make a lot of cookies and he couldn't wait. I baked for a couple of hours and ended up with nearly 40 cookies. When you have to frost 40 cookies you think of one thing, assistants. I knew my daughter would help, but I wanted to see if my husband would pitch in this year. He agreed to decorate 4 cookies. LOL

I prepared the frosting bags/bottles, sprinkle assortments, and we started decorating.


The first thing my husband said was, "So um, how do it do this?" I briefly (20 words or less) explained the art of outlining and flooding. I didn't want to give him a full dissertation on the art of cookie decorating in fear that he would exit stage left! My daughter is too small to outline and flood so I named her "Director of Color" and "Sprinkle Assistant."

We had a lot of fun, and my husband ended up decorating more than 4 cookies! At one point he grabbed a snowflake and the black frosting. I looked up and laughed and said, "Are you making a muddy snowflake?" He replied, "What? No. This is a ninja death star!" I guess his gangster snowman needed a weapon.

We had a lot of fun making a mess and a boat load of memories. Now lets hope there are some left for Santa!

Happy Baking,
AJ

Saturday, November 12, 2011

Happy 1st Birthday Claire!

Today, I delivered cupcakes for a special little girl's first birthday! Her Grandmother, my friend/coworker Alaina, asked me if I could whip up a smash cake and 2 dozen cupcakes that resembled their theme, Hugs and Stitches.

Vanilla smash cake with all of the cupcakes

Up close of the cupcakes. They were topped with buttercream frosting and various handmade chocolate toppers.
These were so much fun to make, and I was able to try my hand at pretzel butterflies and daises! I normally only do numbers or small items, like hearts, so branching out like this was exciting.

Claire, I hope you have a blast smashing that huge cupcake. Thanks again for letting me be a part of your special day. (You too Alaina and Shelby!)

Happy Baking,
AJ

Saturday, November 5, 2011

Woods Wedding

Tonight I attended the wedding of my awesome neighbors, Cary and Danielle. When they were engaged back in July I met Danielle in my driveway for a "ring inspection." :) During that visit she asked me if I would be willing to do the cake for their wedding. I was touched, excited, and scared all at one time. I hadn't ever baked for a wedding, and cakes are not my thing.

Over the last few months I walked over various samples to test before we agreed on flavors. We ended up with a variety: red velvet, chocolate, Italian cream, red velvet/vanilla, cherry cordial, and carrot cake. Here is how it turned out:

The wedding cake/cupcake bar

Up close of the topper cake. Red velvet with buttercream roses

The cupcake bar: red velvet/vanilla, Italian cream, cherry cordial, and carrot cake cupcakes.
All cupcakes had cream cheese frosting except for cherry cordial - they had chocolate buttercream.

The groom's cupcakes. "The 18th hole" with chocolate cupcakes and a personalized golf cart

The entire cake table
 The wedding was amazing, and I know that Cary and Danielle will have a wonderful life together. I was very honored to play a part in their big day! Congratulations again C & D!

Happy Baking,
AJ

Friday, October 21, 2011

Fall Festival Cupcakes and Treats

My daughter's school is hosting their annual fall festival tonight. They offer games in each of the classrooms and a silent auction. Most of the items are themed baskets that each class puts together. This year my daughter's class' theme was art, and they put together a great basket full of art supplies. In addition to class baskets other items get added to the auction from local businesses.

The front desk staff has always been a great supporter of my cupcakes and even promote my business for me. :) Ms. Marlen asked me to donate some cupcakes for this year's auction and I was thrilled. I whipped up a dozen Halloween themed cupcakes and packed a Frankenstein bucket full of treats.


Inside the Frankenstein bucket I packaged sugar cookies made to look like candy corn. I also packaged up some "spooky smores" by putting graham crackers, snack size Hershey bars, and a Halloween peep in a bag! I hope that these treats get a great bid and raise money to help support my daughter's school!

Happy Baking,
AJ

Friday, October 14, 2011

{Fun Idea}: Skeleton Gingies

I ran across a fun cookie idea in a Taste of Home magazine and most recently in a blog posting on Our Best Bites. I decided to give them a try since we were going to a dinner party and needed something to bring.

I was short on time so they didn't turn out as cute as I had hoped, but they are chocolate cookies so that may makeup for it. To transport them I put them in a Halloween 4-pack cupcake box (without the insert), and tied a coordinating ribbon on top. They were fun to make, and it gave my gingerbread cookie cutter a warm-up for Christmas.


Happy Baking,
AJ

Wednesday, October 5, 2011

"Boo Boxes" on sale now!

Halloween is right around the corner. In fact, it is less than 30 days away! To help you celebrate AJ's Cupcakes is offering "Boo Boxes." Each box will include a variety of cupcakes (flavors and decorations) that are sure to spook up any celebration.

Top 3 reasons you need a "Boo Box" this Halloween:
  1. They are a new twist on "Boo Bags." I bet your friends/neighbors would love to have a box of cupcakes on their doorstep!
  2. They can add a unique touch to any celebration at work, home, or a friend's house!
  3. You can hand them out to some of your favorite trick-or-treaters instead of candy!
So what are you waiting for? Place your order today! 

Pricing:
4 pack: $8.00
1/2 dozen: $12.00
1 dozen: $24.00

All orders must be placed by October 21st!

Download this free Halloween subway art from That's What {Che} Said!

Happy Baking,
AJ

Sunday, September 25, 2011

Are you ready for some football?

We are. I love football season. It is such a great sport to watch and it signifies that fall is on its way! This season I am trying to get my daughter more involved in watching the games. Mainly because if she is excited to watch the games she won't ask to watch SpongeBob in the living room while it is on! :P

Today I whipped up some football cupcakes to help us get into game-time spirit. My husband was really glad that I was baking these because we only have one chocolate cupcake left, and he prefers vanilla anyway. Since we live in Texas I focused on two of the games that we are most interested in:


To help me decorate them I ventured onto the homecoming aisle at my local Michael's store. I bought these little helmets in packs of three. I did my research on the match ups first to make sure I got the right colors. Then I printed mini logos, cut them out, and adhered them to the helmet. I also picked up the football themed liners at Michael's.

I had full intentions of getting these baked before the game, but it didn't work out. I was doing laundry and making lunch etc. However, I did learn that baking during the game takes longer. Why you ask? Oh well let me explain:
  • I had to take breaks to yell at the TV. I am an assistant coach, and they needed my advice.
  • When we scored I had to run out and grab my daughter and show her how to do a victory dance. After I left her she said, "Daddy, Mommy is loud."
  • When your team was winning and then starts losing you get upset. Didn't they listen to my advice?
  • When they get close to winning again you have to focus all of your attention on them. They only started doing bad because you weren't watching the TV the entire time.
Needless to say my team lost, but we did get to enjoy a yummy post game snack. Oh, and the helmets double as new toys for my daughter. SCORE!


She wore her helmet on her head, and she is now putting them on her superhero figures. She might just become a fan after all.

P.S. She chose the Redskin's cupcake. I guess we need to educate her on picking teams next. Don't go after the pretty color first honey... *shaking head*

Happy Baking,
AJ

Saturday, September 24, 2011

Never let a good cupcake go to waste...

I had 6 cupcakes leftover from the bling order last night. I put them away in the fridge undecorated, and 4 survived the night. :) Today I decided to decorate them and try out a new filling - strawberries and cream. I enlisted the help of my 4 year old to work on the filling and frosting. She was glad to help pour and count scoops. She was even happier when I told her that she got to sample her work! I think I may have a permanent assistant now whether I want it or not. ;)

The end result was unbelievably amazing. I shared them with my neighbors so they could sample the new creation. The first taste tester, Kristine, loved them. I think she called me a taste bud whisperer or something like that. LOL This just goes to show that you should never let a good cupcake go to waste. It may have been an extra, but it became extraordinary!

Here is the recipe for the filling, just in case you have any spare cupcakes, angle food cake, or a spoon looking for something the do. :)

Strawberries & Cream Filling 
  • 1 cup heavy whipping cream
  • 1/3 cup of sugar
  • 1 tsp of vanilla extract
  • 6-8 tablespoons of fresh strawberries diced
Put strawberries into a food processor/chopper and chop until they are thick and a little liquidity.
Put the whipping cream and vanilla in a mixer and blend until thick. Then add sugar and blend.
Fold in the chopped strawberries

To fill your cupcake, cut out the center with either a knife or the large opening of an icing tip. Spoon in filling, and cover with part of the cake you cut out. The flatter the surface the easier it is to frost.

Happy Baking,
AJ

Friday, September 23, 2011

Bling, bling she's eighteen!!!

My neighbor Mikayla celebrated her eighteenth birthday this week, and tonight is her party. To help celebrate her big day her mom, Kristine, asked me to make cupcakes. When I asked what theme she wanted she replied, "bling." So I whipped up some yummy chocolate cupcakes and topped them with various bling - glitter high heels, candy pearls, and shimmering chocolate hearts. I then made her a special cupcake with an "M" topper and fake diamonds.


When I went to deliver them everyone was getting all glammed up for the event. They were very excited to see the cupcakes, and couldn't wait to put them on display at the party.

I hope you have an awesome birthday party tonight Mikayla. Happy birthday!

Happy Baking,
AJ

Thursday, September 22, 2011

Craft Break!!

I have seen so many adorable Halloween decoration ideas lately. I primarily have been purchasing items to display cupcakes on, but then I realized something... I can't display these items unless they have cupcakes on them. That presents a problem for me, and my hips! There is no way I am baking a weekly supply of cupcakes/cookies. Not that it's impossible, but my jiggly parts have their own opinion!

It was then that I realized that I needed to release my decoration needs on my house! So what if I am a few weeks early. Instead of purchasing items that were already made I decided to make some of my own decorations. One thing you should also know about me is that I have two other hobbies - glue guns and paint! :) I don't pretend to be awesome with either of them. I ALWAYS burn myself with that darn glue gun, but I have so much fun making stuff.

This week I tackled an area of my house that I am often at a loss for how to decorate - the fireplace. I normally throw nicknacks all over it and tilt my head and squit one eye and say, "yeah that looks ok."

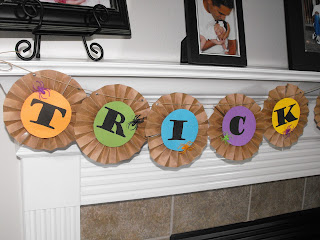
I knew that I wanted pumpkins, something for the mantle, and a way to dress up the large mirror that hangs above it. So here is what me and my trusty sidekicks came up with:


I will start at the top and work my way down. The mirror is decorated with mirror clings from Martha Stewart. These things are AWESOME. They are smaller than the standard window clings so they are just the right size for a mirror. Oh and they remove just as easy...

The mantle was probably my most favorite part. I saw this idea on a guest blog post from House of Smiths. I changed mine up a little bit because I don't normally decorate "scary" for Halloween. I like the cute fun side of things.


This was my first time making any sort of garland/banner for my fireplace. I think this concept lends itself to all occasions. I may make another one for Thanksgiving! :)

Finally, the pumpkins!

I am all about reusing stuff so these pumpkins are fake. I wasn't about to work so hard on them and then toss them out! I painted various pictures or words on them and then accented the ones in the back to make them stand out more.

I am very pleased with how this came out, and now I can't wait to get the rest of my decorations out of the attic!

Happy Baking or Crafting,
AJ

A Super 4th Birthday!

My daughter celebrated her 4th birthday a couple of weekends ago. For the last several months she has been obsessed with superheroes. Not Barbies, Hello Kitty, baby dolls...superheroes! That made choosing her theme pretty easy. Since there are a lot of heroes to choose from, I decided to narrow in on a few - Batman, Spiderman, and Superman.  To make the party "super" the kids had superhero makeovers, played games, and met a few surprise guests.

Here are a few pictures from the party:
The cupcake table. Chocolate and vanilla cupcakes with hero ring toppers

The super friends group with our surprise guests - Batman, Superman, and Spiderman
My nephew enjoying his cupcake. He had red frosting all over his face! :)
The birthday girl after her superhero makeover

Our family with the heroes
The party was a great success, and I had so much fun planning it. Later that night my daughter was swinging in the backyard while I was picking up chairs. She said, "Mommy, that was a great great party." My heart melted and I went inside and started planning her 5th birthday party. Just kidding.

Happy 4th Birthday Bug! Mommy & Daddy love you.


Happy Baking,
AJ

Saturday, August 27, 2011

Bad girls, bad girls, whatcha gonna do...

Whatcha gonna do when they come for you?

My baby sister will be celebrating her 20th birthday tomorrow. We got together tonight for a family dinner to celebrate, and of course I brought cupcakes. It not only was a celebration for her birthday, but she was recently accepted into the police academy. :)

To commemorate both special occasions I made her some cop cupcakes:

Red velvet and cream cheese is her favorite. To "cop" them up I topped them with handmade chocolate stars and marshmallow cubes to mimick the light bar on the top of a police car. Handcuffs weren't too easy to make and if I tried to make a small gun out of chocolate it might have looked like a stick. LOL

After the waiters/waitresses made her stand on a chair so they could loudly sing her their rendition of happy birthday she enjoyed a cupcake with her ice cream. She offered her boyfriend one and he curled his lip - he isn't a fan of red velvet. I encouraged him to give my version a try. I told him if he didn't like it I would not be offended if he didn't eat it all. He peeled the liner, took a bite, and left me sitting there anxiously awaiting his verdict.

He replied, "Not to bad." He then ate almost all of it. :) My cupcakes have the power to convert haters to lovers. Ha!

Happy birthday Anna!

Happy Baking,
AJ

Ooh baby, baby

Today I have a cupcake delivery for a baby shower. A group of girlfriends are getting together to celebrate the adoption of a little baby girl. When Natalie contacted me about the order she made me smile. She said something to the effect of, "I signed up to bring the cake/cupcakes and I knew I would call you." Have I ever told you that I love my clients? Well, um, I do! :)

I sent her a few concepts and we finally agreed on vanilla and chocolate cupcakes with three different designs. Here is how they turned out:


Here is the design run down (L to R):
  • Lavender tinted buttercream in a flower swirl with pearl sixlets
  • Lavender tinted buttercream with a white hand cut fondant flower on top
  • Lavender tinted and white buttercream swirled with sugar sprinkles on top
Natalie,
I hope you and your friends have a wonderful time celebrating the new baby girl's arrival! Enjoy your cupcakes.

Happy Baking,
AJ

Celebrate good times, come on!

Last weekend was filled with a lot of celebrations! I knew of at least 5, and I am sure there were others. First, my family and I were set to travel to Austin for a close friend's wedding that also landed on my husband's birthday.

Then there were a series of children's birthday parties that I worked on cupcakes for. The entire weekend turned out great, and the cupcakes were a lot of fun to make. Here are some of my creations from last weekend:

Tinkerbell Fairy Party
Our amazing photographer Jenny Miller, of Jenny Miller Photography, was hosting her daughter's Tinkerbell themed 3rd birthday. She picked up the cupcakes on Friday and she told me that her daughter, who she calls Miss Priss :), continued to ask her for one up until the party.

The vanilla cupcakes were decorated to match the 4 colors used in the invitation, and topped with all sorts of things to give it that fairy touch. I used Tinkerbell rings, hand cut fondant flowers of various sizes, and finally the most important touch - pixie dust!

Here is how they turned out:


Dora and Diego Party
In addition to the Tinkerbell cupcakes I crafted up some cute Dora and Diego cupcakes for a pair of siblings celebrating their birthday's together at Chuck-e-Cheese. Their mom Renee asked me to make up a couple of dozen cupcakes for the guests and two jumbo cupcakes for the birthday boy and girl!

The vanilla cupcakes were decorated with yellow and blue tinted buttercream, coordinating confetti sprinkles, and topped with character rings. The jumbo cupcakes (picture in next section) were topped with the same frosting, sprinkles, and the liner was wrapped with ribbon.

Here is how they turned out:

Jumbo Cupcakes
Finally, I worked on 4 jumbo cupcakes for various birthday boys and girls. Two of them were for the Dora and Diego sibling celebration. Another one was for my friend's son who was turning one, and the last one was for my husband. He saw me baking all of these cupcakes, and he knew they were for clients. I didn't want him to think I forgot him so I snuck in on especially for him. :)


After we arrived in Austin I took the boxed cupcake out of its hiding spot in the luggage and put it in the refrigerator in our room. Later that night I snuck it out, light the candles, and we had an impromptu celebration for him! I asked him he if knew about it and he said no. Success!!

Tuesday night tutorial
My friend Danielle was working on her son Carter's first birthday. He was the proud owner of the #1 jumbo cupcake above. His favorite movie is Despicable Me, and he loves the minions. Who doesn't? Those little guys are so cute. I want one for my house - seriously.

She asked me if I had any ideas of what she could do.  I found a concept online and shared it with her. Then we hosted a "minion making tutorial" at my house on Tuesday night. It consisted of chocolate, eyeballs, Twinkies, and lollipop sticks - sounds like a party to me. I checked in with her on Saturday to see how her minion making went. She said they turned out great. YAY! *high five D*

Here is how Danielle's minion cupcakes turned out...so CUTE!

See I told you it was a party packed weekend last week! August is a celebratory month. Are you tired from just reading this post?

No matter how many parties, making cupcakes is so much fun. Whether I am making them myself, or teaching someone else how to, cupcakes never get boring!

Happy Baking,
AJ

Saturday, August 6, 2011

DIY Cupcake Stand

My daughter's superhero themed birthday party is drawing near, and I have been trying to spread out tasks over a few weekends. This weekend I tackled the cupcake stand. I am making 4dz cupcakes so I wanted to make sure I had a stand that would hold most of them. This stand will hold about 32 cupcakes, and I plan on putting the rest on the table around the bottom tier.

To help explain the process I tried to take photos along the way, but I have to admit that I get a little clumsy when the glue gun heats up. I was often too worried about burning my hands or hot gluing something to the table. I am happy to report though that I successfully completed the stand, and I didn't need any bandaids! Oh and my table is fine. :)

Before I share the instructions, here is the final product:


Here is what you will need:
  • pencil
  • ruler
  • hot glue gun
  • 6", 8", 10", and 12" cardboard cake rounds - 2 of each size
  • 3 cans with labels removed (make sure they are the same size)
  • 2 styrofoam rounds for the "feet"
  • card stock to cover the cake rounds and "feet"
  • 5/8" ribbon to cover the cans
  • 1.5" ribbon to border the cake rounds
  • additional accents that match theme (letters, stars etc)


Here is how you do it:
  1. Trace one of each size cake round onto separate pieces of cardstock. Cut out.
  2. Glue coordinating cake rounds together. Make sure to glue the brown sides together vs the white sides.
  3. Glue cardstock to one side of the double layer cake rounds.
  4. Cut a strip of cardstock to wrap around each of the "feet". Center them on the bottom of the 12" cake round and glue.
  5. Cut 6 strips of  the 5/8" ribbon to wrap around each can. When applying start at the glue line on the can to ensure all of your seams are in the same place.
  6. Determine the center of each cake round and outline the location for the can. You should measure on the top and bottom to ensure they are stacked appropriately.
  7. Once assembled let glue sit for 5-10min. You want to ensure it is all set.
  8. Starting with the top cake round outline the edge of the round with glue and start adhering the 1.5" ribbon. Always ensure you start your seam at the back (where the can seams are). This way you can ensure none of your seams are showing when you setup the display.
  9. Create additional accents for the topper as desired.

To further accent the stand I painted a wooden letter A and fixed it to lollipop sticks. Then I attached foam glitter stars to thin wire. On the day of the party I will put these into the cupcakes on the top tier.


 Since we are doing a superhero theme we will be filling the stand with chocolate and vanilla cupcakes decorated with Spiderman, Batman, and Superman decor. I incorporated the stars and polka dots to "girl" it up a little bit! I think the style would also work for a boy's birthday.

My daugther was really excited when it was done. She kept coming in and checking on me throughout the process. Maybe she knows I am a klutz with a glue gun...

Happy Baking,
AJ

Stand adapted from the Annie's Eats blog

Friday, August 5, 2011

Beat the heat with this cupcake treat!

Tonight I decided to whip up a nontraditional cupcake for dessert, and I didn't even have to heat the oven. Before I explain let me show you:

Yes, these are little bowls of ice cream formed in a jumbo cupcake pan. Therefore, they are properly named Ice Cream Cupcakes! The crust is made up of finely crushed waffle cones, and they are filled with blended vanilla ice cream. Here are the flavors:
  • Confetti sprinkles
  • Mini Reese's cups
  • Mini Oreo cookies
  • Chocolate syrup
  • Maraschino cherries
To top them off I whipped up some homemade whip cream, and added some coordinating garnishes. It was a delicious post-dinner treat.

Happy Baking Freezing,
AJ

Recipe adapted from Everyday with Rachel Ray

Saturday, July 30, 2011

When life gives you lemons...frost them!

Today I attempted to bake a new flavor of cupcakes - cannoli. I was inspired from my Taste of Home magazine as I was flipping through the pages one night and saw a cannoli cake. I immediately thought, "I want to flip that into a cupcake." It shouldn't be too hard. Right!?!

I baked the vanilla cupcakes, made the filling, and then mixed up the frosting. I was pleased with how fast they had come together. It reaffirmed that my flipping idea wasn't going to be that hard. It was then that I read the next line of the directions..."cover frosting and place in refrigerator until it is set enough to spread." Sounded straight forward enough. It didn't tell me how long this process would take so I decided to give it time and get some errands done.

I took my daughter to the nail salon with me. We both got mani/pedis. We picked lunch up on the way home, arrived back at home, and ate. Then I remembered the frosting. I thought, "Man, that should be good to go now." Checked it - not good to go. Returned back to watching TV, playing with my daughter, and getting stuff ready for our family photo shoot. Another hour passed, checked it - not good to go.

I then decided that I needed to speed this up. I was set to deliver some of these cupcakes to my friend and my awesome photographer in just a couple of hours. Into the freezer it went. Checked it nearly an hour later, still not good to go! Now I know that magazines try to keep their pages clean and not overly verbose, but you would think that they would have considered posting a statement on this recipe that read, "Frosting will need a two week vacation in Iceland before you can spread it on anything." SHEESH! I finally decided that my cannoli cupcake hopes were over for today, and turned to my trusty wingman chocolate buttercream for help. I whipped some up and frosted the cupcakes. Then I added some chocolate chips on top. They were intended for the cannoli cupcakes so using them made me feel a little victorious.

At the end of the day I still had yummy cupcakes to share with my friends and a few extra dirty bowls. The lesson of the day is when life gives you lemons (like bad frosting recipes) don't fret. In the end you may not have ended up with what you wanted but you got a really great alternative!


Happy Baking,
AJ

Saturday, July 23, 2011

Fun, Fabulous, and Fifty!

Holly called me to help out with her Mom's upcoming 50th birthday. When I asked her what the theme was she told me "Fun, Fabulous, and Fifty." Then she sent me a picture of some of the decorations so I could get some ideas. When I saw the combination of polka dots, zebra print, black, white, and pink I knew these were going to be FUN!

Vanilla cake with pink buttercream frosting. Decorated with black sixlets, zebra sugar sheets, and "50" candles

After the cupcakes were ready I drove them to the restaurant to setup for the party. The cupcakes were only some of the fabulous decor Holly had purchased. I mean the theme does have to live up to its name right?!? There were balloons with boa borders, zebra printed wine glasses, candy dishes with special 50 candy inside, and signs for each table. You name it they had it!

Here are the cupcakes setup for the event:


I hope you have a happy birthday Tracy! I am sure it will be a fun and fabulous way to turn fifty.

Happy Baking,
AJ

Friday, July 22, 2011

It's a wedding shower

A friend, and mentor, from work is getting married! Yay! To celebrate several of us girls got together to surprise her with a wedding shower at Mia Bella's. She was quite shocked when she arrived as she thought she was only dining with one of us today - not eleven. We are often sneaky like that!
We all had a great time chatting, watching the bride-to-be open gifts, and dining on Italian food. To cap off the celebration we had cupcakes for dessert. Afterall, it's the proper way to end a celebration. Actually, it's the proper way to end anything - end of a week, end of the day, end of an hour, end of a blog post... :)

Here are the treats that I whipped up for our gathering:

Vanilla cupcakes with buttercream frosting and "I Do" topper
Devils food cupcake with buttercream frosting and handmade red chocolate hearts covered in sprinkles

Below is the bride-to-be Shelly (on the right) with our friend Shelly L. getting ready to enjoy their cupcakes!


Congratulations Shelly & Matt! Enjoy your upcoming wedding, and the wonderful adventure of marriage!

Happy Baking,
AJ